27 Ideas For “She’s Tying the Knot” Bridal Shower
The nautical rope centerpiece sits half-finished on my kitchen table, and I’ve been staring at it for twenty minutes. Turns out, tying an actual knot for a “tying the knot” shower is harder than Pinterest makes it look. But that’s the charm of this theme—every detail leans into the pun, and guests eat it up.
From anchor-shaped sugar cookies to “knot your average bride” banners, a rope-and-ribbon bridal shower gives you endless room to play without veering into cheesy territory. Ahead, 27 ideas covering invitations, decor, food, games, favors, and a few unexpected touches that’ll make the bride cry (in a good way). Some are budget-friendly. Others go all out for the maid of honor with a Michaels addiction. Grab a coffee and start bookmarking.
The Welcome Table Setup
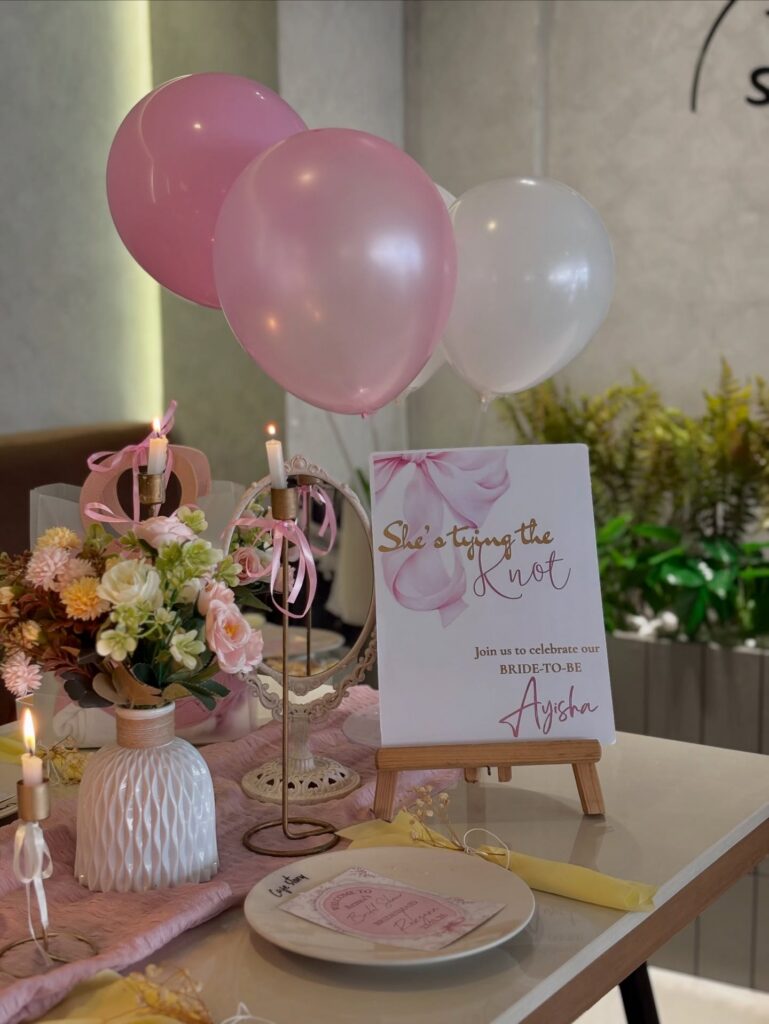
Three balloons tied to a single candleholder is doing a lot of heavy lifting here — it keeps the vertical element without needing a balloon arch or a full backdrop. The sign on the mini easel is what anchors the whole table, so if you’re printing one, go slightly larger than you think you need. A white textured vase, some ribbon-wrapped candles, and a loose flower arrangement in pinks and yellows keep everything from looking too matchy.
The plate with cards on it is a good touch — guests can pick one up as they arrive, which gives them something to do with their hands. I’d skip the mirror accent personally, it can get lost among everything else and just adds clutter. Works really well for smaller gatherings where one styled table is the main focal point.
Knotted Napkin Places
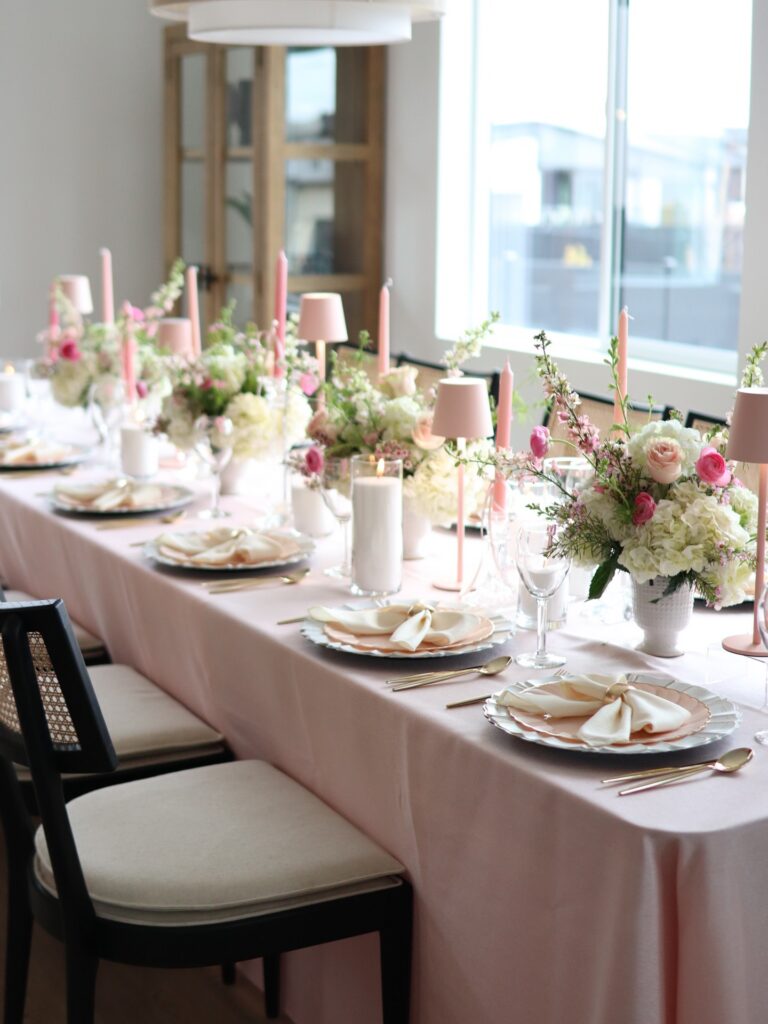
At each setting, let the knot do the talking before anyone reads a sign or a menu. Use a cream napkin, twist it loosely, then tie one soft knot and lay it across a scalloped plate so it feels like part of the place setting rather than a craft project. Keep it loose.
The blush tablecloth with pink taper candles already carries the theme, so you don’t need rope, banners, or every object shaped like a bow. If your table is narrow, I’d skip the little lamps and spend that money on lower flower cups down the center, since tall pieces can get in the way once people start passing plates.
Photo Clip Drink Markers
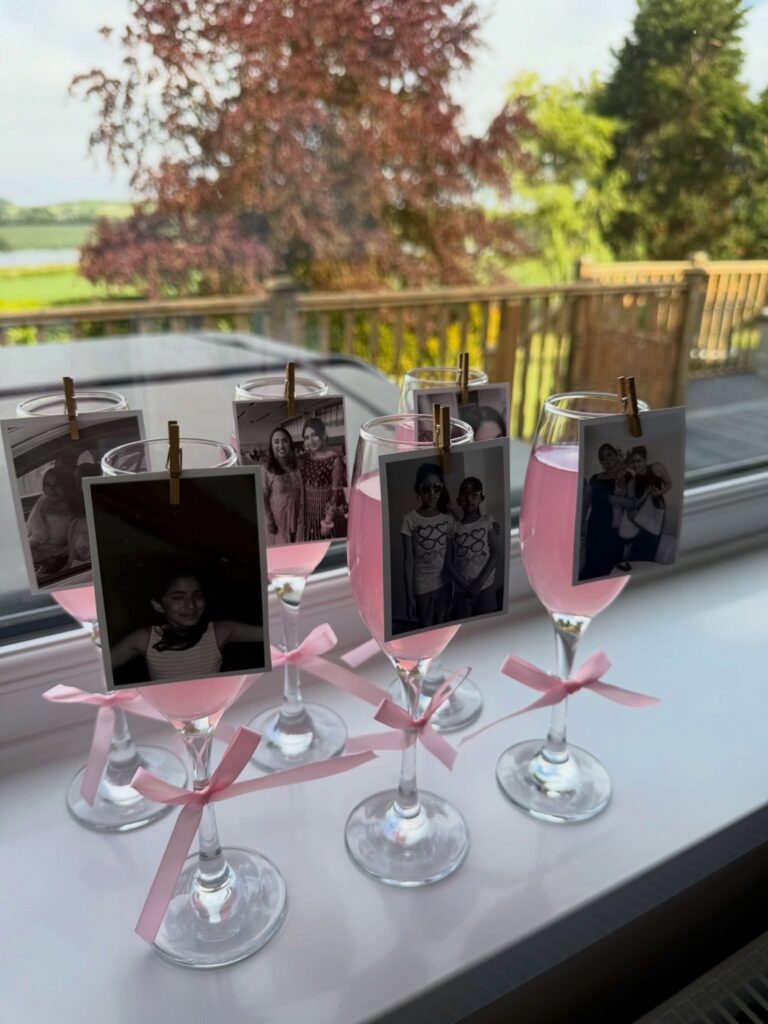
Mini wooden clothespins clipped to the rim of each wine glass, each holding a printed photo of the bride with a different friend. Guests find their drink by finding themselves. The pink ribbons tied around the stems match the drink inside, which is a nice touch but honestly optional — the photos do the heavy lifting.
Print the photos small. Instax size or 2×3 inches works, anything bigger tips the glass. Black and white mixed with colour looks better than all one or the other.
One thing. If you’re serving anything fizzy, clip the photo to the stem instead of the rim so nobody knocks it into their drink reaching for a sip. Learned that the hard way at a hen do in June.
Draped pink backdrop
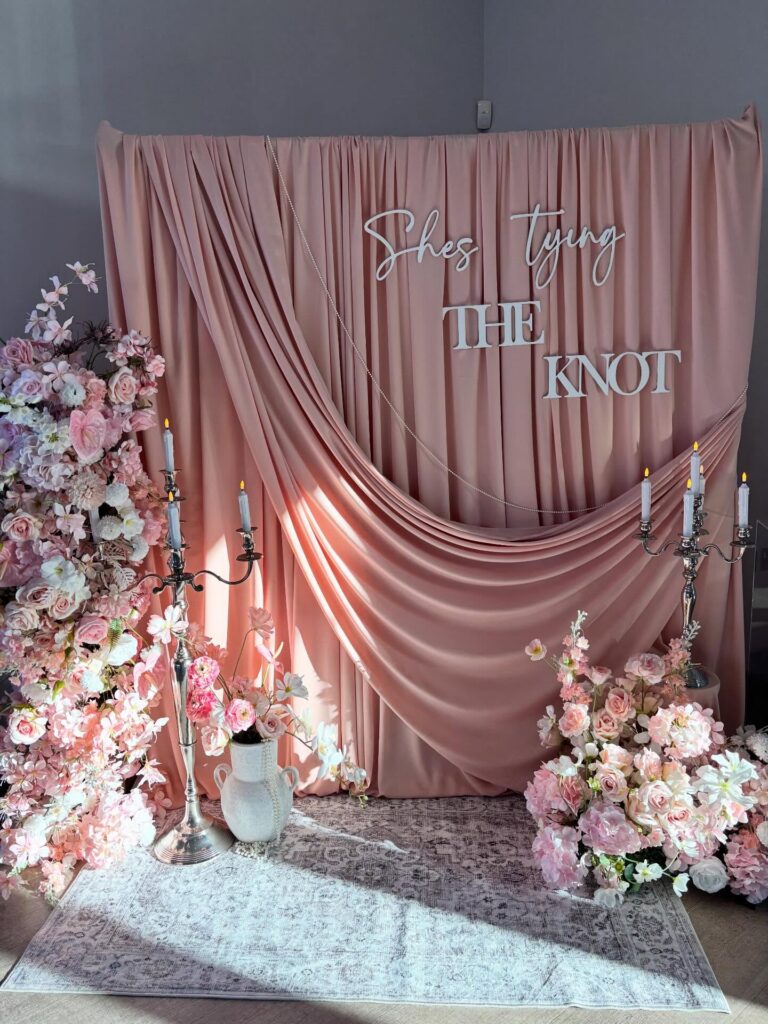
Start with the fabric first. That gathered pink backdrop does most of the work here, especially with the extra swag draped low across the front, so you don’t need a complicated install or a huge flower budget.
Use one clean phrase in mixed lettering, like the script-and-block “She’s tying the knot,” because the contrast shows up well in photos and keeps the wall from looking flat. Then place florals mostly at the base and to one side instead of spreading them everywhere, which gives you that full look without buying twice as many stems.
The silver candelabras help break up all the pink. Important detail.
If you want to copy this for a home shower, use battery taper candles and keep the rug light and a little faded so the whole setup doesn’t start looking like a stage set.
Custom Macaron Boxes as Favors
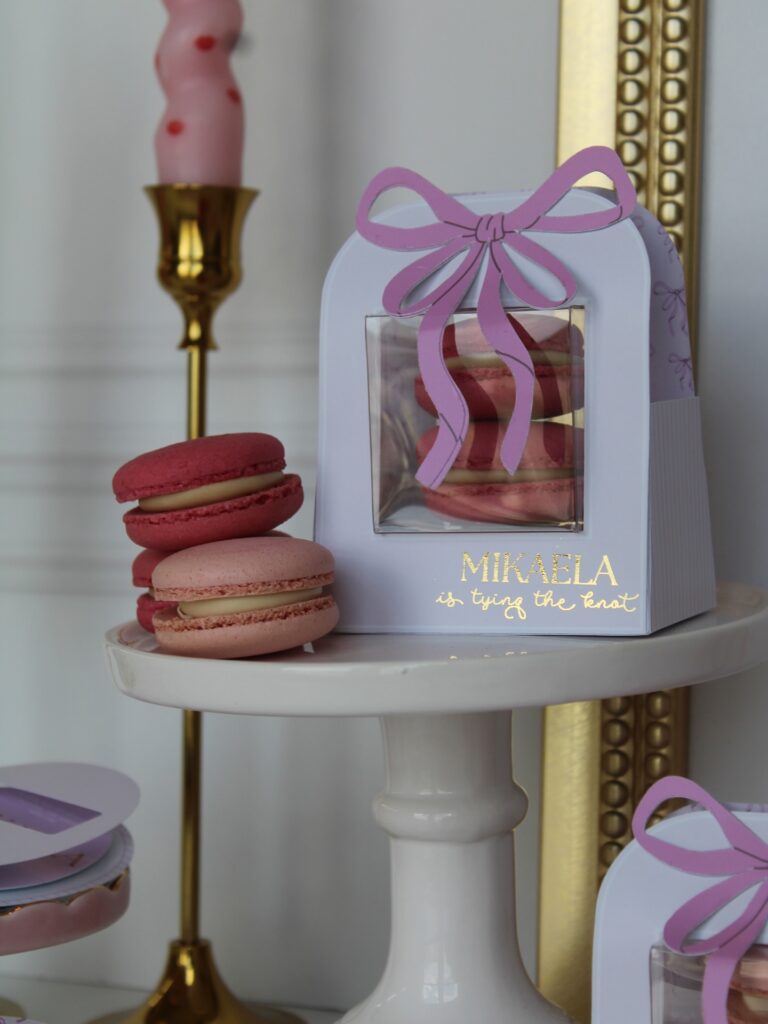
The box here does most of the heavy lifting — white with a die-cut bow on top, a clear window showing the macarons inside, and “Mikaela is tying the knot” printed in gold script along the front. That combination of personalisation and actual food is why this works better than most favours, which usually end up forgotten in a bag. Order these through Etsy shops that do custom macaron packaging; most ask for name, date, and colour preferences.
Match the box colours to your table — here it’s lavender and pink, which ties back to the loose macarons stacked on the cake stand beside it. Two or three macarons per box is plenty. Going bigger just drives the cost up without adding much.
Bow Napkin Place Settings
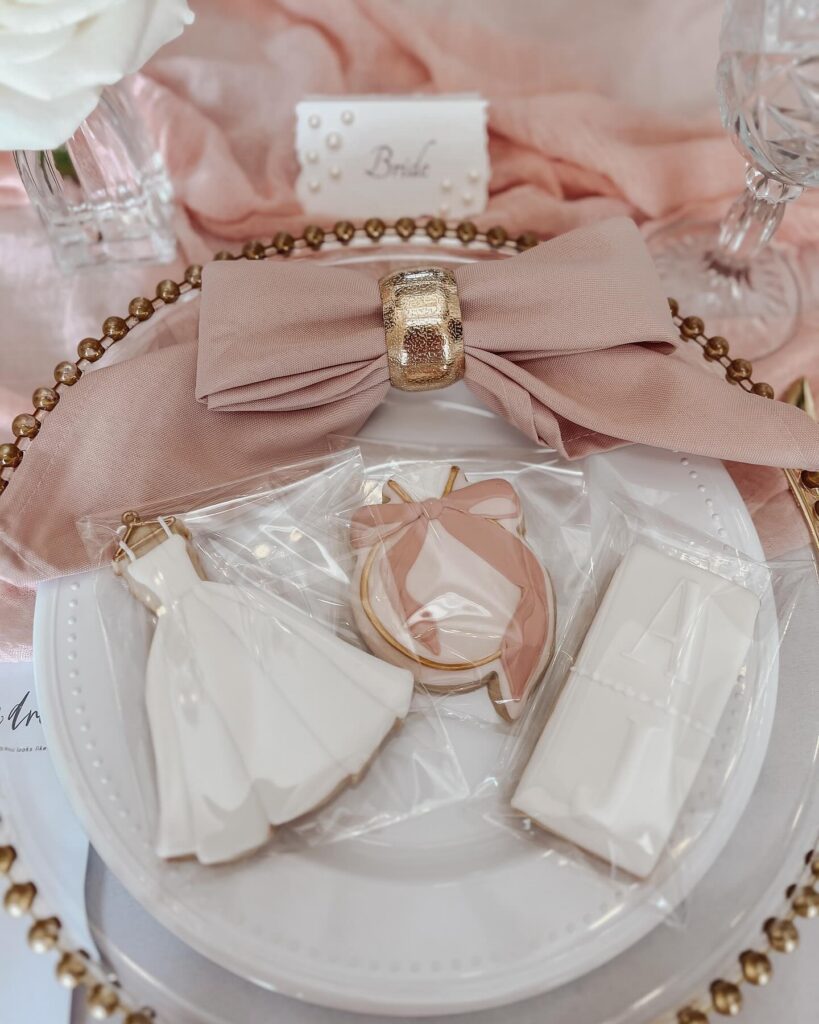
Start with the napkin bow because that is doing most of the work here. Keep the bow wide. A blush cloth napkin folded through a chunky gold ring gives the table that “tying the knot” idea without needing signs on every corner.
Add one wrapped cookie on the plate, like the dress or initial cookie shown here, so each guest gets something to take home before dessert is even served. The little bride place card with pearl dots is worth copying if you have assigned seats, though I’d skip it for a casual shower because it becomes one more thing to write and arrange. Use clear plates or white plates under everything, otherwise the soft pink starts looking messy fast.
Matching Mini Bottles and Wine
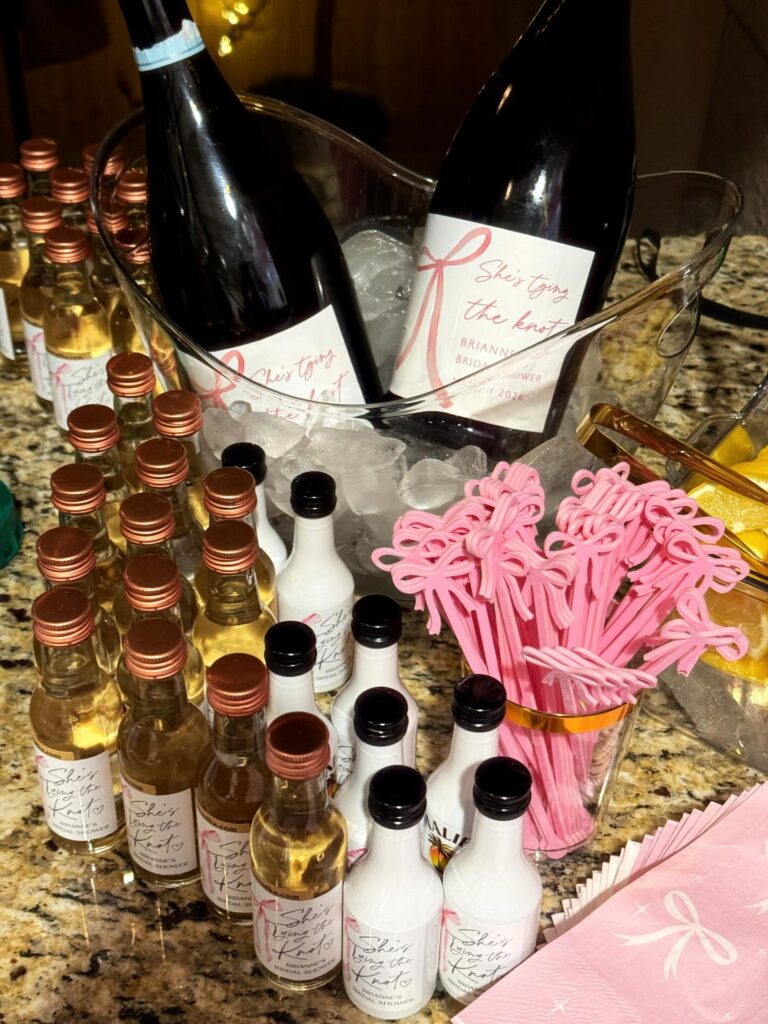
The trick here is repetition. Same custom label, same pink bow motif, stuck on both the mini liquor bottles and the full-size wine — so the drinks table reads as one setup instead of a bunch of separate favors. Guests grab a mini to take home, pour wine at the party.
Order the labels from Etsy in one batch and apply them yourself the night before. Fiddly but cheap. The bow-shaped drink stirrers in that gold cup are the detail I’d actually copy first — they tie the whole thing to the theme without another sign or banner.
One thing I’d change: skip the clear plastic mini bottles with printed labels if you can. The frosted white ones photograph much better next to the wine, and the amber ones look muddy in person.
Curved backdrop corner
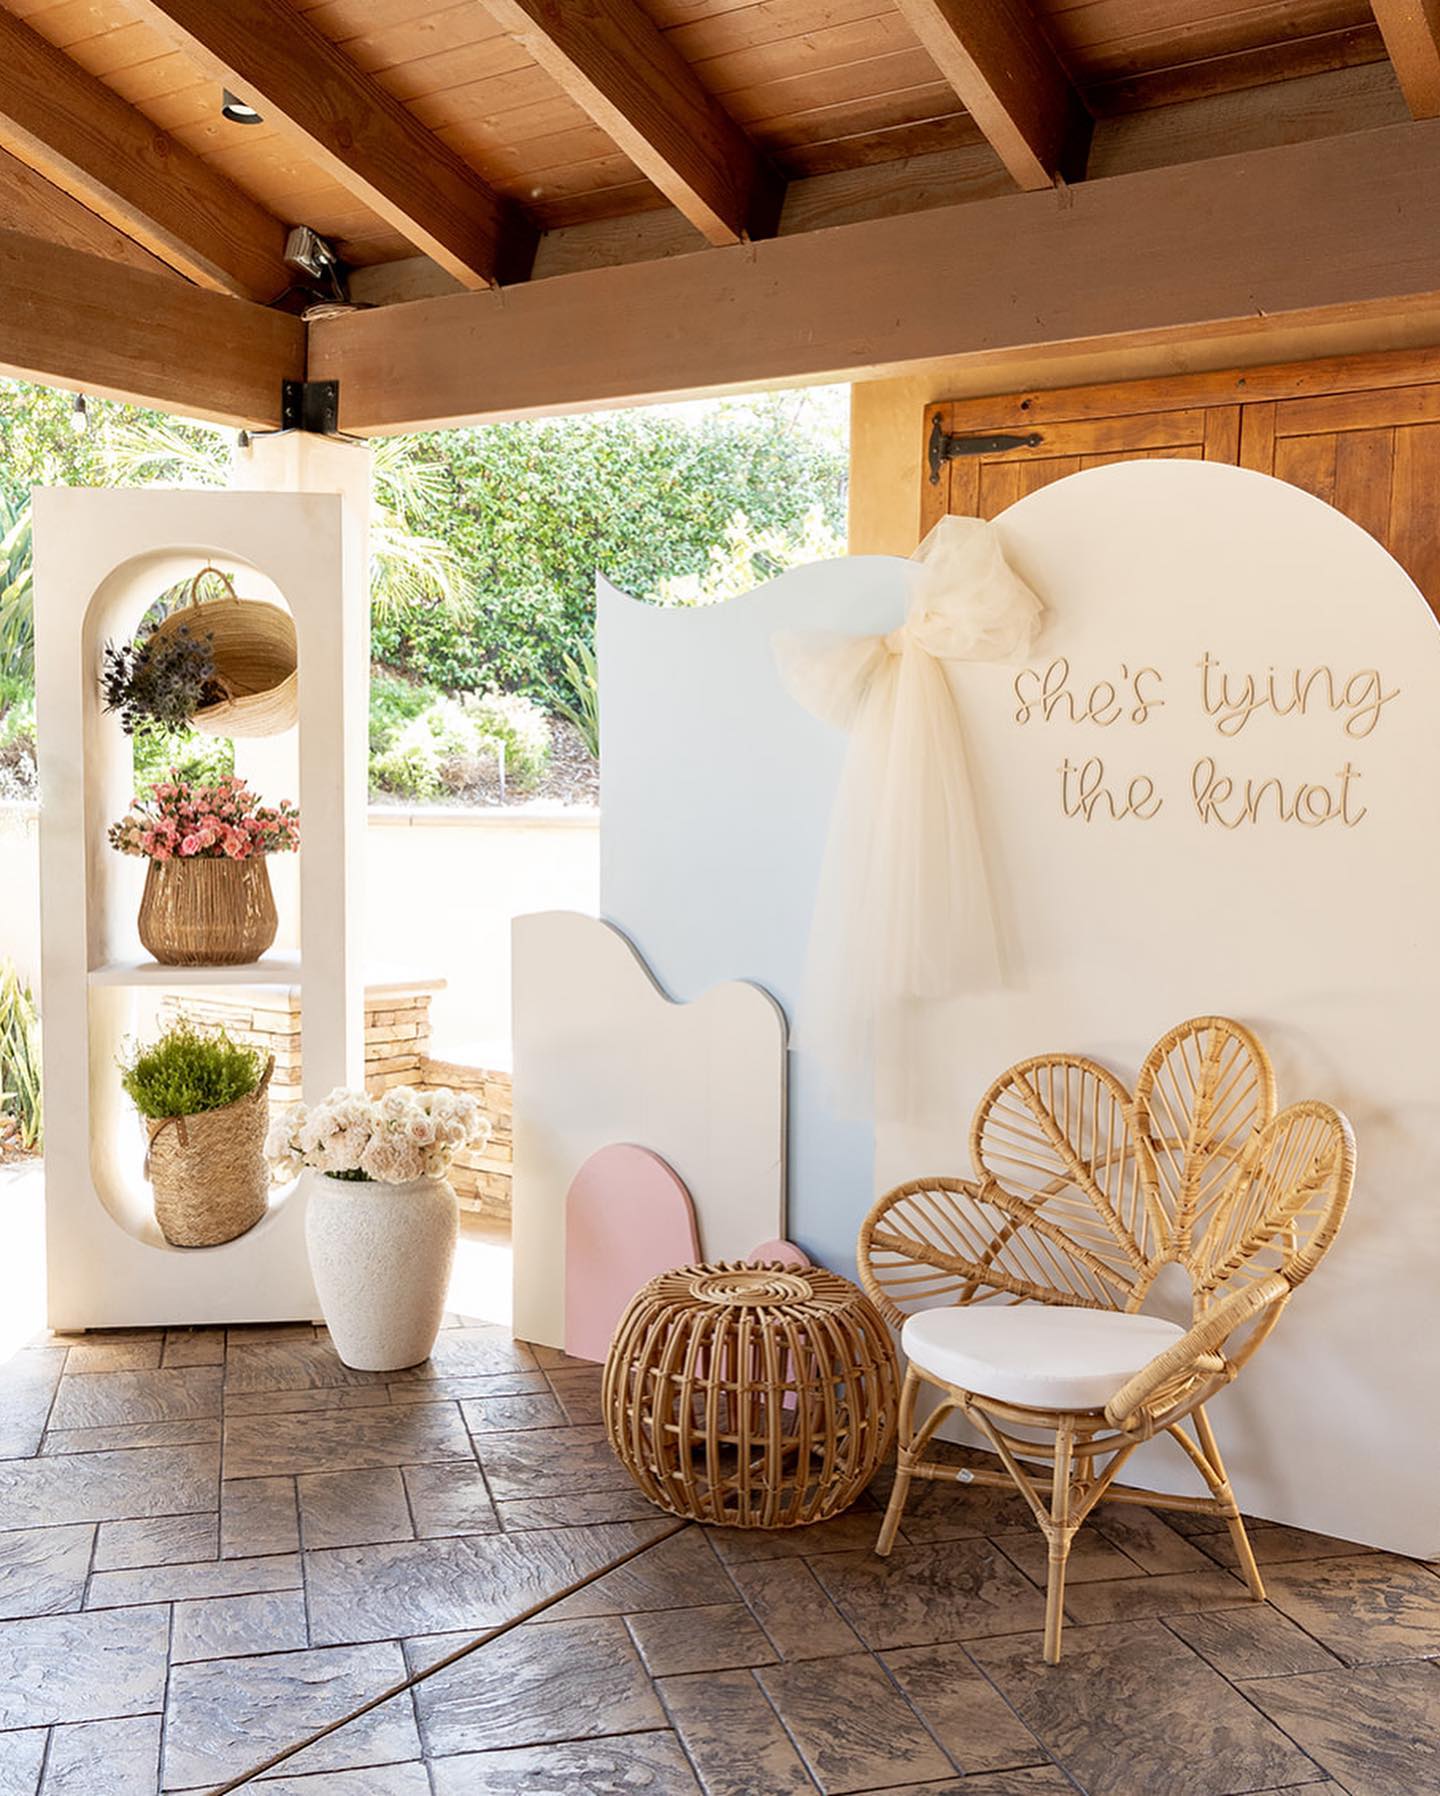
Start with the backdrop shape. Those rounded white panels do most of the work here, and they keep a “she’s tying the knot” setup from looking too theme-heavy or too bridal-store. Add the phrase in script, then soften one side with a single tulle bow instead of draping fabric everywhere.
The wicker peacock-style kids chair is what makes this corner actually usable, because guests can sit for photos instead of awkwardly hovering in front of a sign, and the little round rattan stool gives you one more layer without taking up much floor space.
Keep the palette light. Cream, blush, pale blue, natural wicker.
The shelf with baskets and one vase of flowers helps fill the left side, but I’d skip packing every cubby if you’re setting this up yourself since styling lots of small objects takes longer than you think.
Cakesicles for the Bridal Party
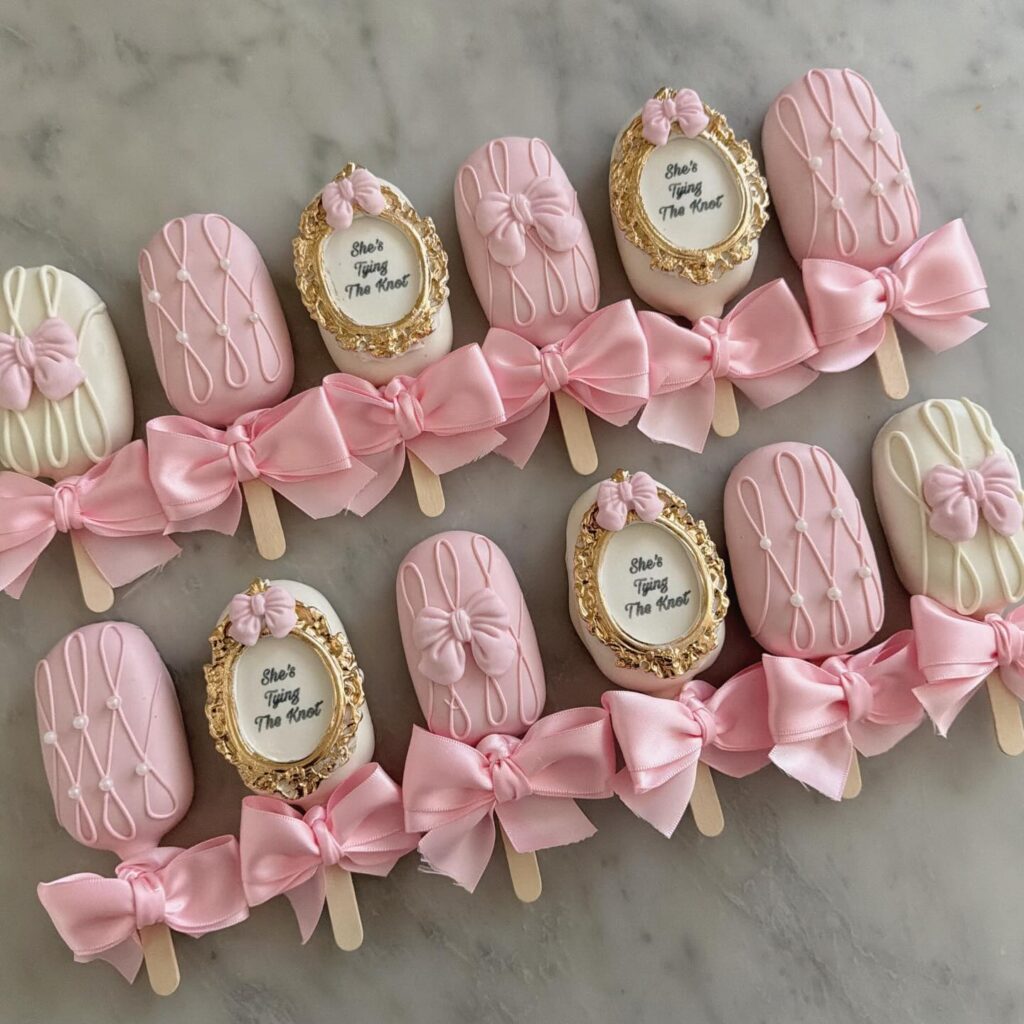
These work really well as favors because each guest walks away holding something. The wooden stick, the satin bow tied around the middle, the gold ornate frame with “She’s Tying the Knot” printed inside — that’s three layers of detail on one palm-sized treat, and somehow it doesn’t look overcrowded. Most custom cakesicle makers offer a flavor choice alongside the decoration, so you’re not sacrificing the eating part for the look.
The ones without the frame medallion still hold up on their own, which is worth knowing if the medallions push the price too high per unit. Order a mix of both. White and pink together reads better as a spread than a single color repeated across all of them.
Sugar Bar Cart
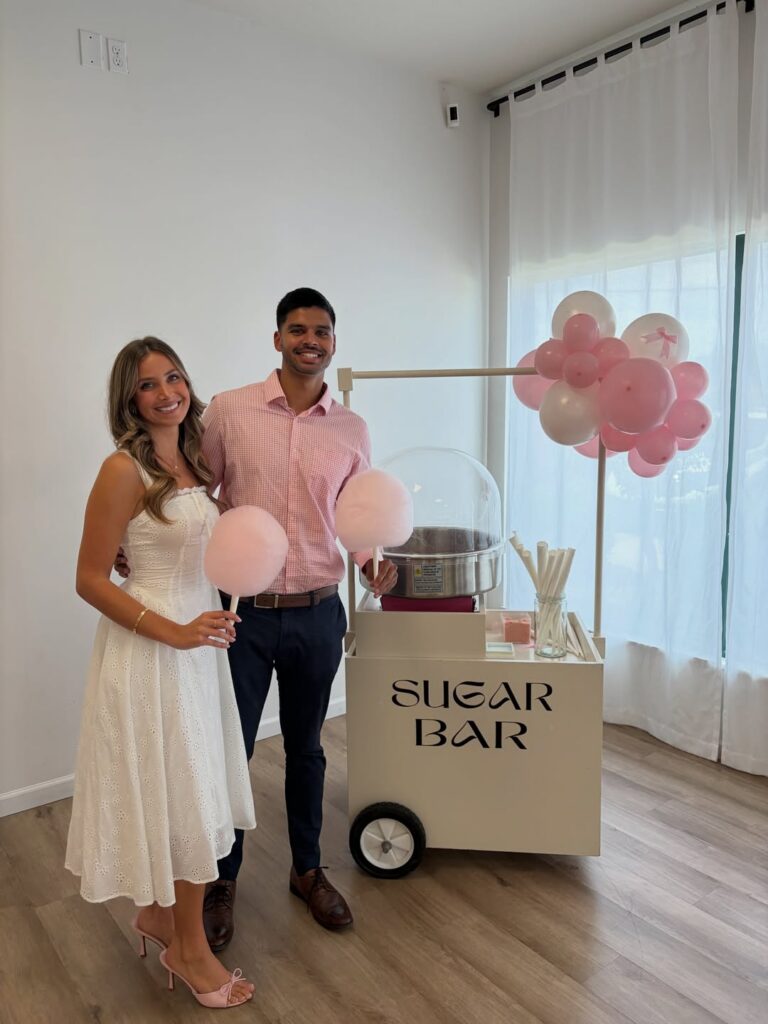
Set it beside a plain wall, the way this cart is, so the cotton candy and the little balloon cluster do the work. That matters. A sugar bar is easiest when you keep the treats to one station: cotton candy, candy sticks in a glass vase, and a few wrapped sweets people can take home.
Use a rollable cart if the venue allows it. The wheel detail makes it feel like a real stand, not a folding table with a sign taped on. For the knot part, tie tiny ribbon bows around the candy bags.
I’d skip a full dessert table here; it competes with the cotton candy machine and makes the corner harder to manage.
The Lambeth Cake
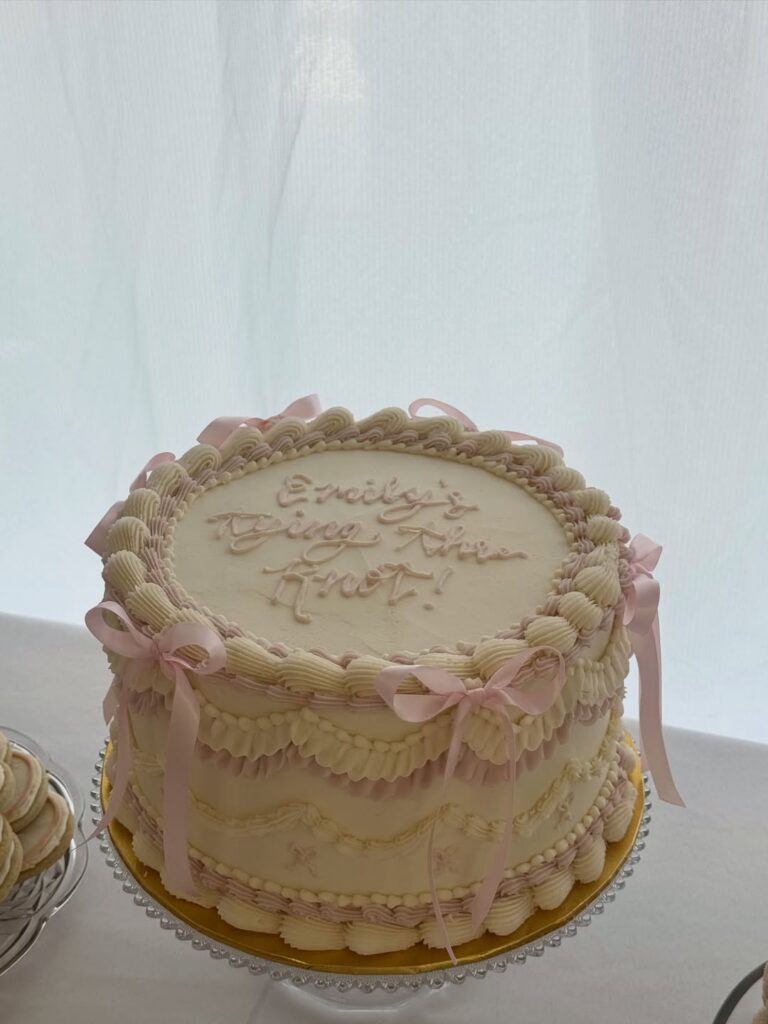
This style is having a real moment. The piped scallops, the little swags, the pastel bows tied around the top edge — it all reads vintage without feeling like a costume. What makes this one work is the restraint. One cake, one color story (cream with soft pink), and the message piped in cursive right on top so you don’t need a topper or a sign nearby.
If you’re ordering one, ask specifically for “Lambeth style” and send a reference photo. Bakers charge more for this piping, sometimes double a plain buttercream, so it’s worth knowing before you ask. The fabric bows are cute but I’d skip them. They pick up crumbs when you cut into it and someone has to fish them out.
Seating chart moment
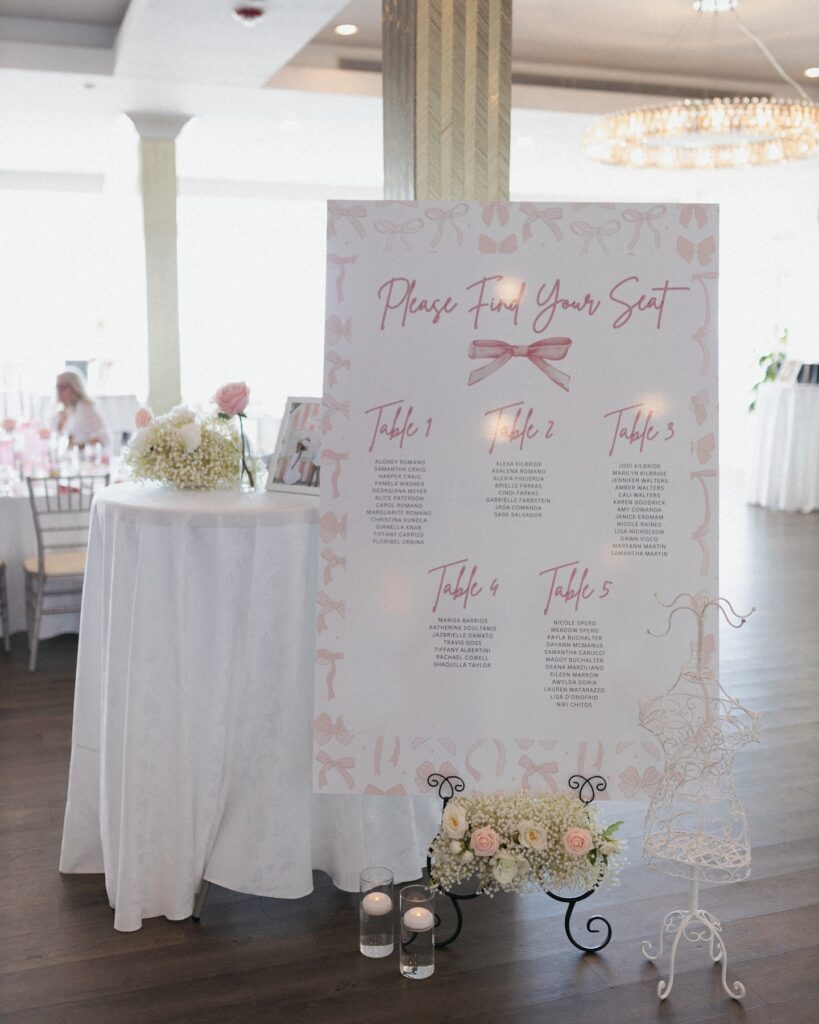
Start with the seating chart. A large white board with pale pink script fits this theme because it already echoes the “tying the knot” idea without needing extra jokes, and the bow printed in the middle keeps it on-theme in a way guests catch right away.
Keep the palette tight. Pink, white, and a little black from the stand is enough, then use baby’s breath and a few blush roses at the base so the sign doesn’t look like it’s floating there by itself. Two glass candles in front help fill the floor space and make the setup feel finished in photos.
This works best for a seated shower with assigned tables. If you’re doing a casual buffet at home, I’d skip the full chart and make smaller table cards instead, because one oversized sign can be more trouble than it’s worth.
Champagne Wall with Floral Base
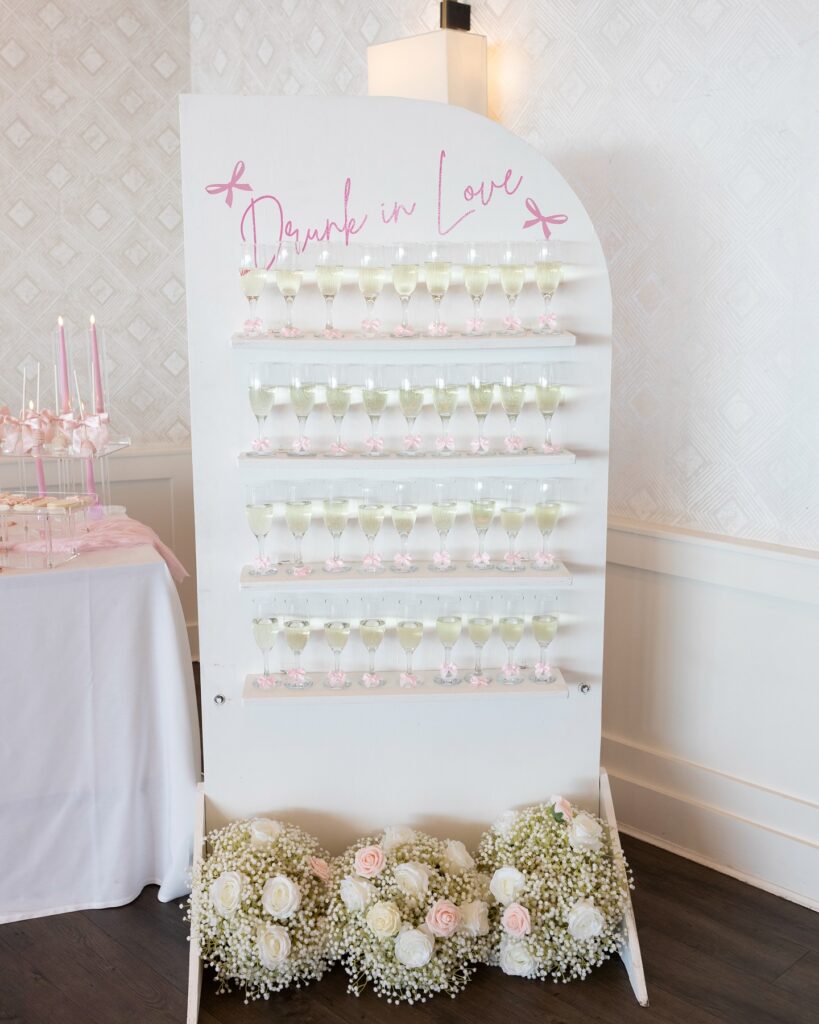
Those pink ribbon bows tied around each flute stem are doing a lot of work here — they make the whole wall feel intentional rather than like a prop rental that just showed up. The wall itself is straightforward to hire; most event rental companies carry the white arch-panel style now. What you’re really planning is the flowers at the base and the signage at the top, because those are the two things guests will photograph.
Baby’s breath is cheap and fills space fast, which is why it works so well clustered with roses down there. Pre-fill the flutes before doors open. Honestly, skip trying to do it after — warm champagne, rushed pouring, spillage.
Not worth it. This suits a mid-to-large group well; for under 20 guests, a smaller two-shelf version is enough.
Bow Topped Drink Cart
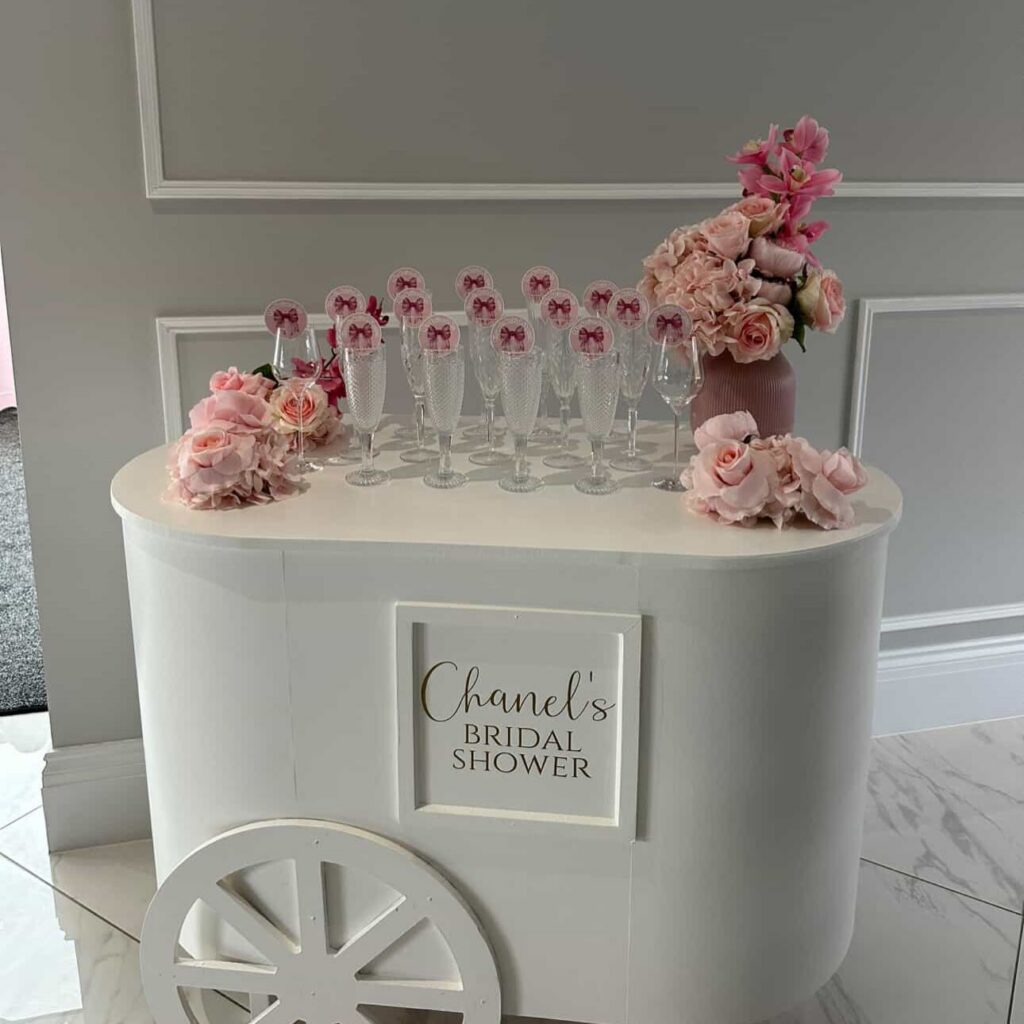
For the drink corner, a small white cart does more than a full bar if you style it with some care. Keep the glasses in rows, then add paper bow toppers or stirrers so the “tying the knot” line shows up without needing a huge banner. Very easy.
The flowers matter here too, because the pink bunches soften the cart and make the glasses feel planned instead of just parked there before serving. I would keep the sign low on the front, like this one, so guests still see the drinks first. If you are serving mocktails, use the same flutes and no one will miss anything.
Little Pink Bow Glasses
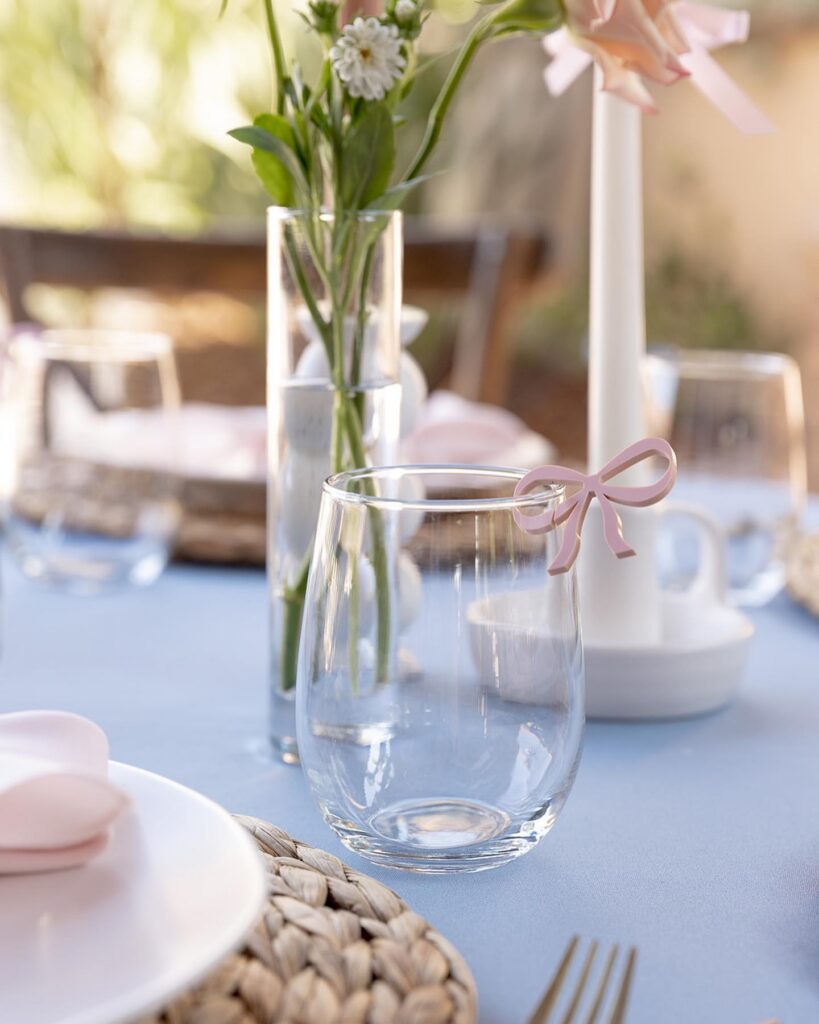
The bow charm clipped onto the stemless glass is doing all the work here. It’s a tiny detail. Guests notice it when they pick up their drink, and it doubles as a way to keep track of whose glass is whose, which matters once people start setting them down on the table and wandering off.
You can find acrylic bow charms online for cheap, or cut them from pink cardstock if you’re on a budget. I’d skip the matching bud vase and taper candle situation shown here unless you already own them — the bow on a plain glass over a dusty blue cloth is enough. Adding three more pink elements starts to feel like a lot.
Works best for a smaller shower where every place setting gets seen.
Cherry sign backdrop
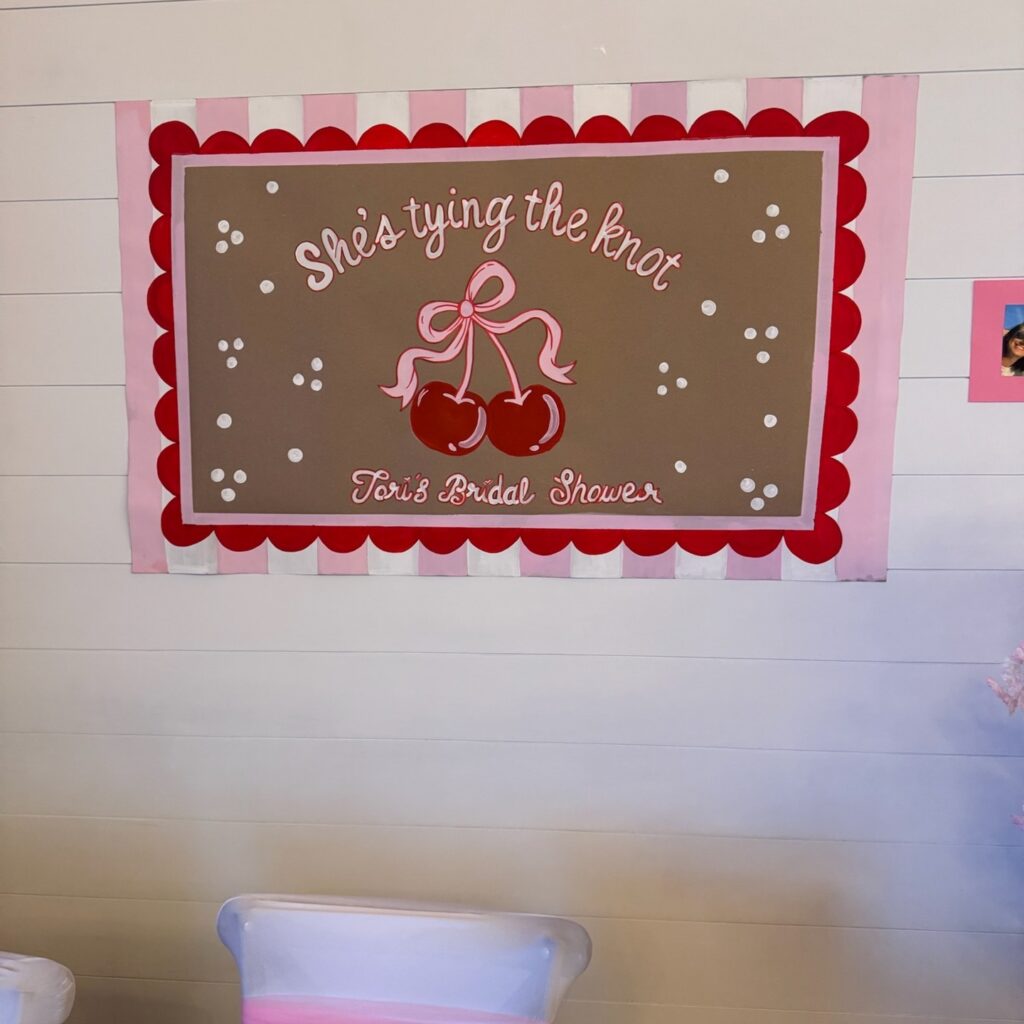
Start with the sign. A large panel with a brown center, pink striped border, red scalloped edge, and the cherry-and-bow graphic does a lot of the decorating for you, so you don’t need to crowd the wall around it. Keep the wording curved at the top and smaller along the bottom like this, because it fills the space without looking stiff.
The brown background matters more than you’d think, since it keeps all that pink and red from turning sugary, and it also makes white lettering stand out well in photos from across the room. Very practical.
Hang it above a chair, gift table, or dessert setup. If you’re making one yourself, paper layers work fine, but I’d skip tiny details unless someone has a cutting machine. The scalloped red frame is the part worth keeping.
A Build-Your-Own Toast Bar
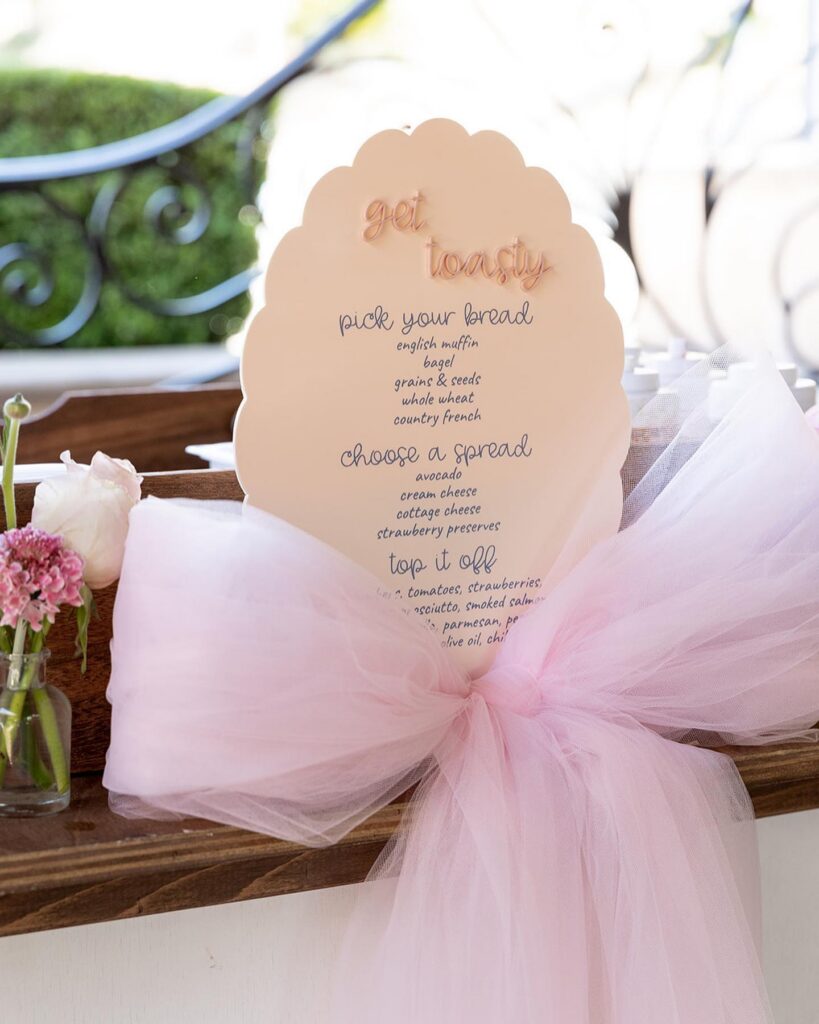
The scalloped sign does a lot of the work here — it breaks the menu into three clear steps: pick your bread, choose a spread, top it off. That structure is worth copying almost exactly, because guests at a bridal shower are often milling around and don’t want to think too hard about food. English muffins and bagels are smart anchors since they hold toppings without falling apart mid-plate.
The smoked salmon and prosciutto in the “top it off” section pull it away from feeling like a basic breakfast spread. A small glass bud vase with a couple of pink flowers on the side is the kind of thing that costs almost nothing and rounds the whole station out. Skip the tulle bow if your theme is less overtly girly — a linen ribbon does the same job.
Bow Dessert Table
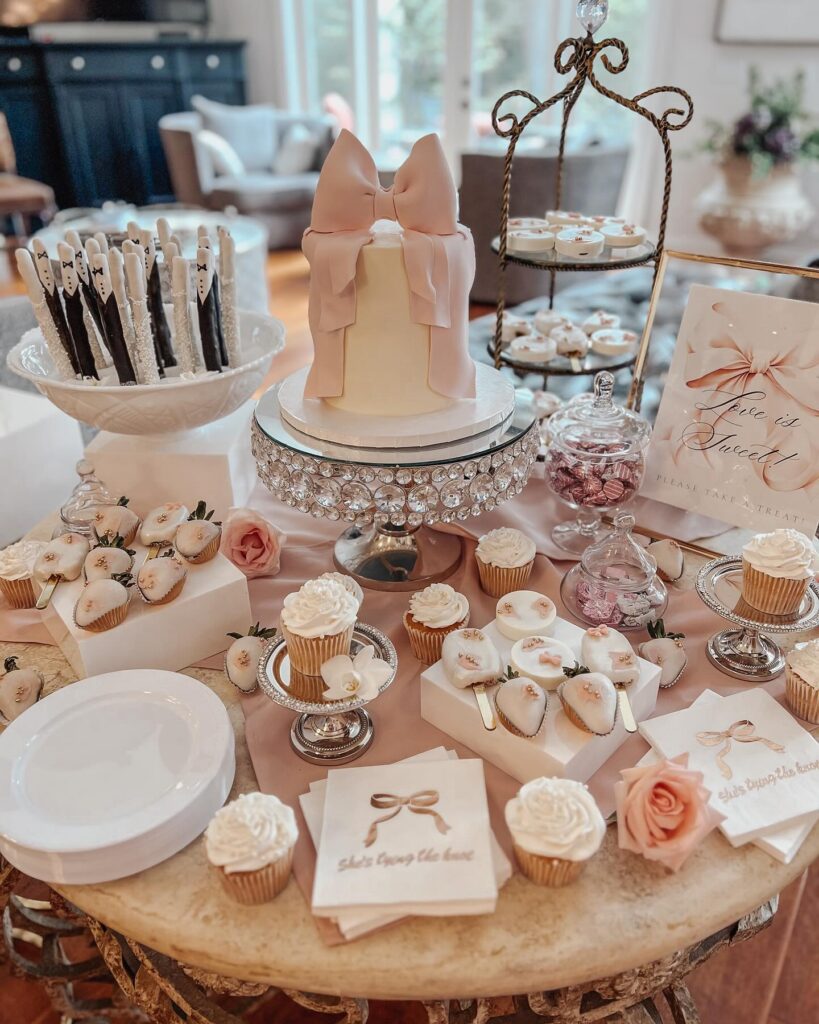
With the cake raised on a crystal stand, the whole table gets a clear center without needing much else. Use one large bow on the cake, then repeat smaller bows on napkins, cookies, or favor tags so the tying-the-knot idea does not feel random. That is enough.
Chocolate-dipped pretzel rods in a bowl are worth adding because guests can grab them while talking, unlike cupcakes that need plates and a free hand. I’d skip the extra candy jars if your table is small; they crowd the sweets faster than you expect.
The Blush and Bow Table
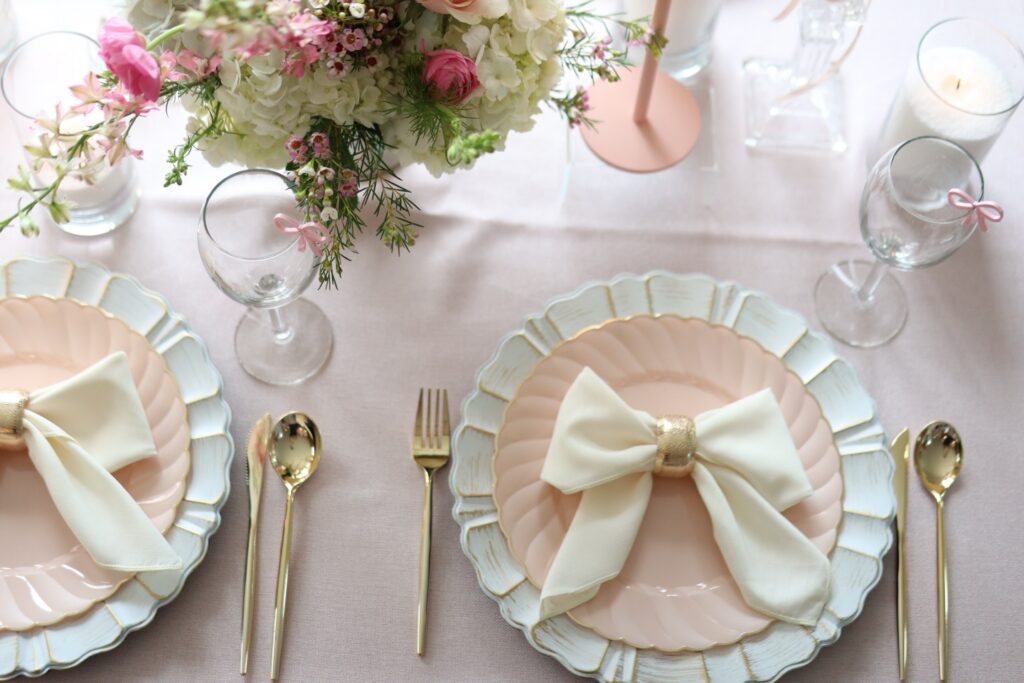
Two plates deep, that’s the trick here. A scalloped mint charger under a blush salad plate, with a cream napkin tied into a bow through a gold ring on top. The bow is doing most of the work. If you can’t find napkin rings you like, a strip of gold ribbon knotted around a folded napkin gets you most of the way there for a few dollars.
Gold flatware pulls the whole thing together with the ring. Keep the glassware plain so the layered plates stay the focus — one wine glass with a tiny pink bow charm is enough. Hydrangeas and wax flower in the centerpiece keep it loose rather than florist-stiff. I’d skip the pink taper holder, honestly. It competes with the bows and the table already has enough going on.
Balloon clusters overhead
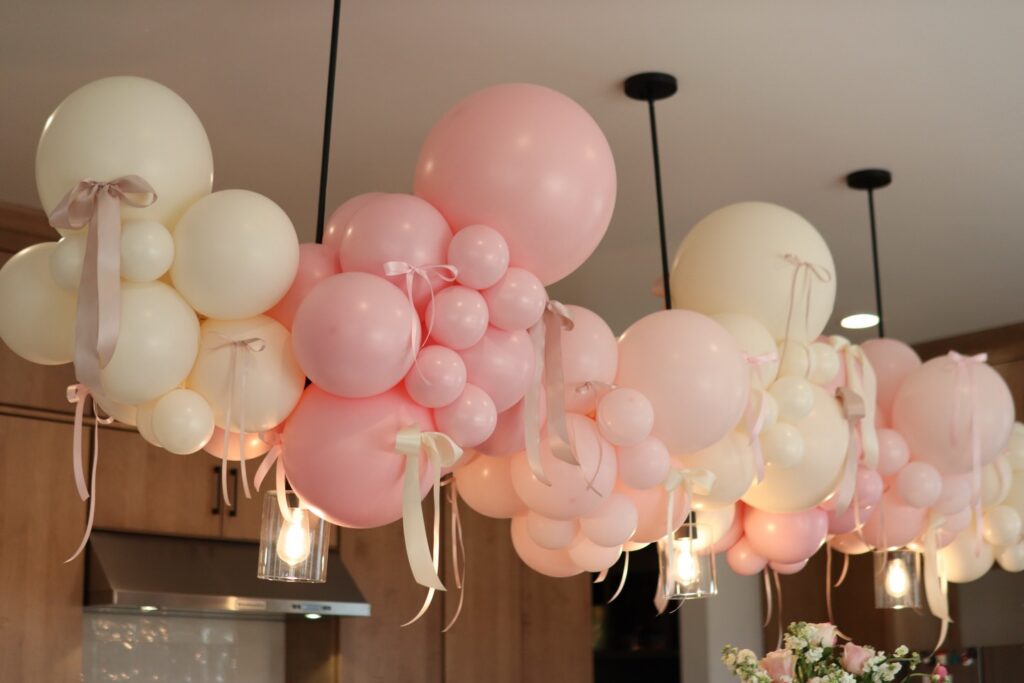
Hang the balloons from the ceiling instead of building one big arch by the gift table. It keeps the table and floor clear, and those loose ribbon tails give you that “tying the knot” part without needing extra signs everywhere.
Use two main colors only. Here it’s blush pink and cream, and that works because the mix of big round balloons with the smaller filler ones already gives it enough going on, especially when you group them around the black pendant drops instead of trying to cover every inch of ceiling.
This suits a kitchen shower or brunch at home. More practical.
Tie satin ribbon onto a few of the larger balloons, not all of them, or it starts looking fussy fast, and leave some space between clusters so each one reads as its own little installation. If I changed one thing, I’d keep the ribbons cut to mixed lengths but not too long near food.
One Rose Does Enough Work
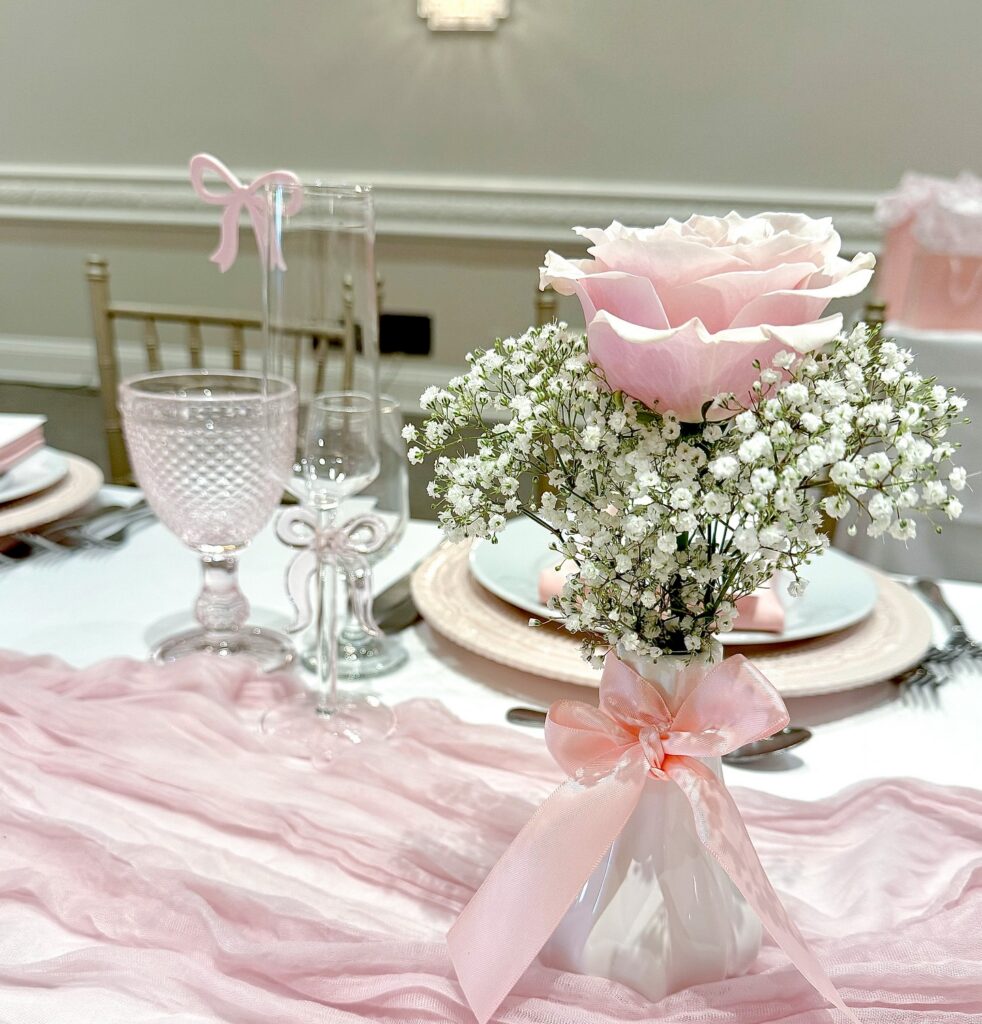
A single oversized bloom sitting above a cloud of baby’s breath pulls more attention than a full bouquet would. The white bud vase keeps the cost down, and the satin ribbon tied around it connects it back to the rest of the table without doing anything complicated. Those hobnail pink goblets and the bow-stemmed glasses behind it are easy to source from party rental companies — you don’t need to buy them.
What this setup suits well is a smaller guest list, maybe 10 to 15 people, where you can actually put one of these at every place setting rather than a single centerpiece nobody can see past. If the blush rose is out of season or overpriced, a white garden rose holds the same shape.
Flower Welcome Board
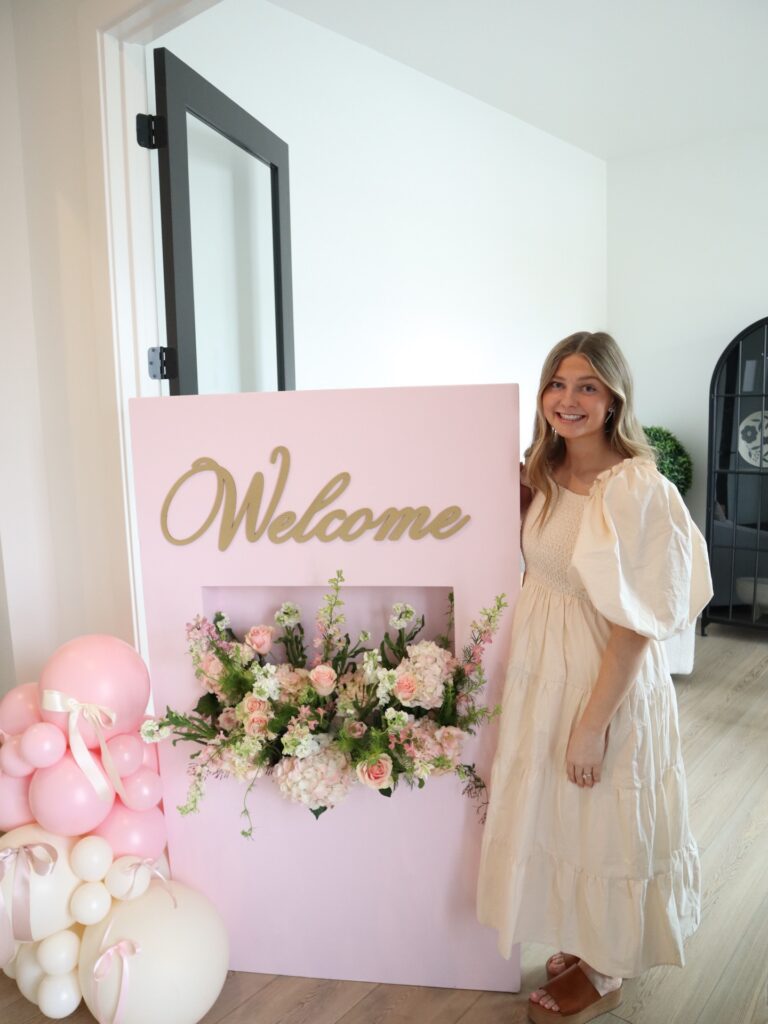
Start with a tall painted board, then cut a shallow rectangle into the middle so the flowers sit inside it instead of looking taped on afterward. The pink paint gives the roses and hydrangeas something to sit against, while the gold welcome lettering still shows up in photos near the door. Keep the balloon bunch low.
Tie a few satin ribbons onto the balloons if you want the knot theme to show without spelling it across every corner. I would use faux flowers for the main fill and add a few real stems at the front, since a fresh arrangement this size gets heavy fast.
The Oversized Bow Backdrop
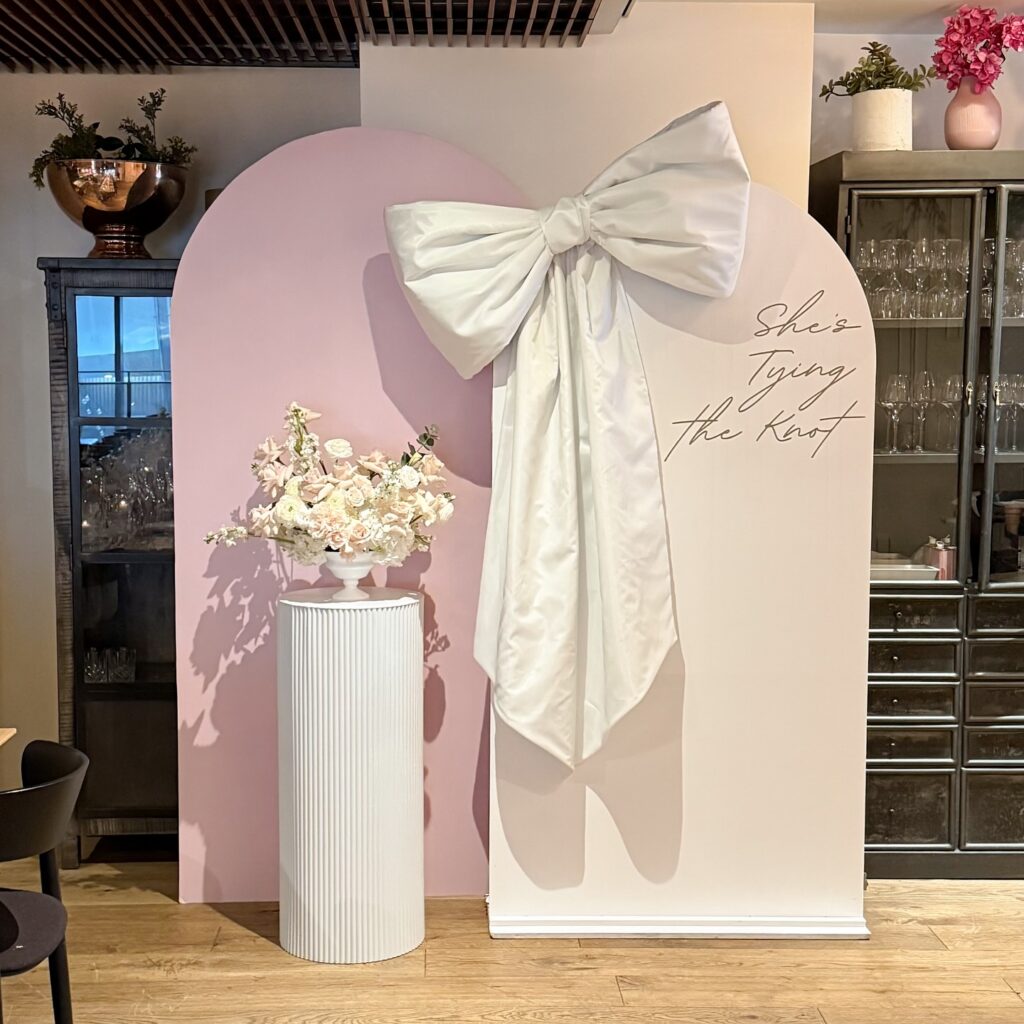
That giant satin bow is doing all the work here. You could stand a smaller flower arrangement next to it and still have a photo wall people line up for. The pink arch behind the white board adds depth, which matters — a single flat panel would look like a trade show booth.
If you’re making this yourself, the bow is the part to spend money on. Use real satin or duchess fabric with some weight to it. Cheap polyester goes limp and reads as plastic in photos.
The script text is small enough to feel like a signature, not a banner. I’d skip the pedestal florals if space is tight. The bow alone is enough. Keep the arrangement loose and pale so it doesn’t fight the fabric.
Ribbon chair detail
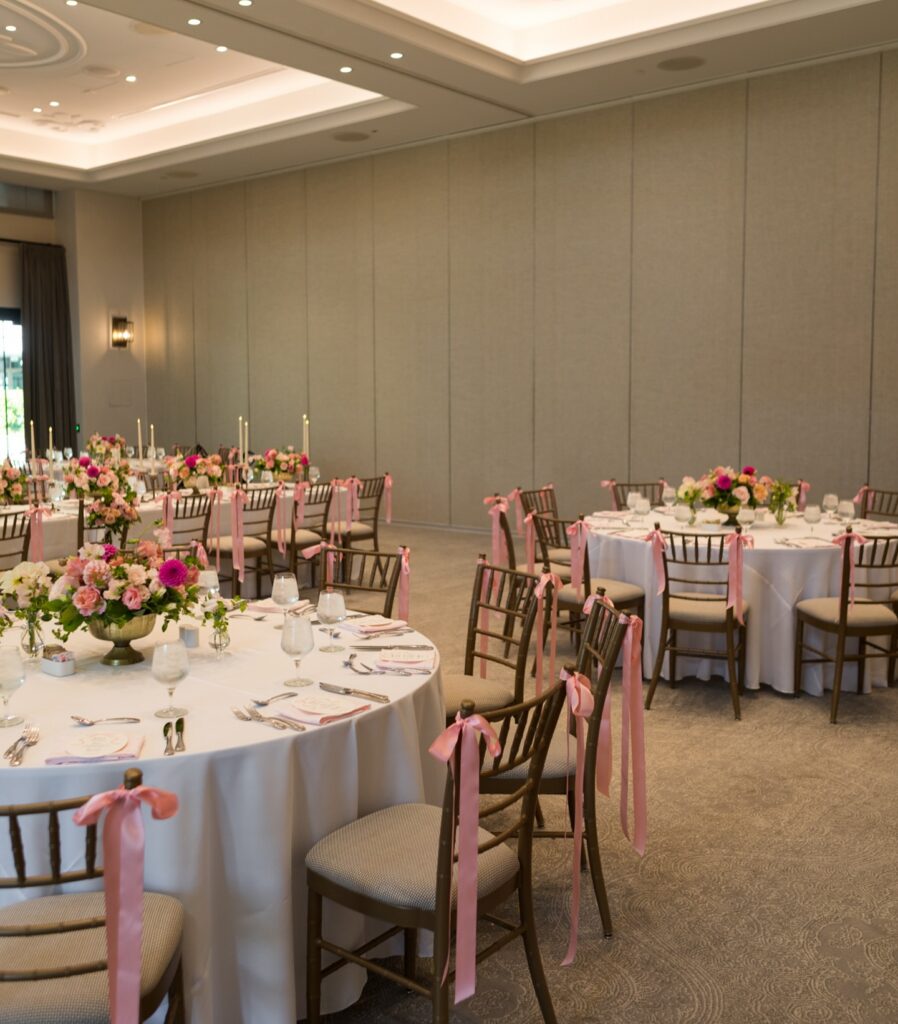
Those pink ribbons tied onto the backs of the chairs do a lot without costing much. Use them if you want the shower room to feel dressed up even when the tables stay pretty standard with white linens and round setups. Keep the ribbon long so it hangs past the chair back, and don’t overwork the bow. A loose tie looks better here.
The flower centerpieces matter too. Go for low arrangements in pink, cream, and a little brighter magenta so guests can still talk across the table without leaning around a tall vase. That part really helps when the shower is more lunch and chatting than games.
This suits a hotel or banquet room. Those spaces can look flat fast, and the ribbons break up all the beige. I’d skip ribbons on every single chair if you’re decorating alone. Outer aisle chairs are usually enough.
A Welcome Sign That Does the Work
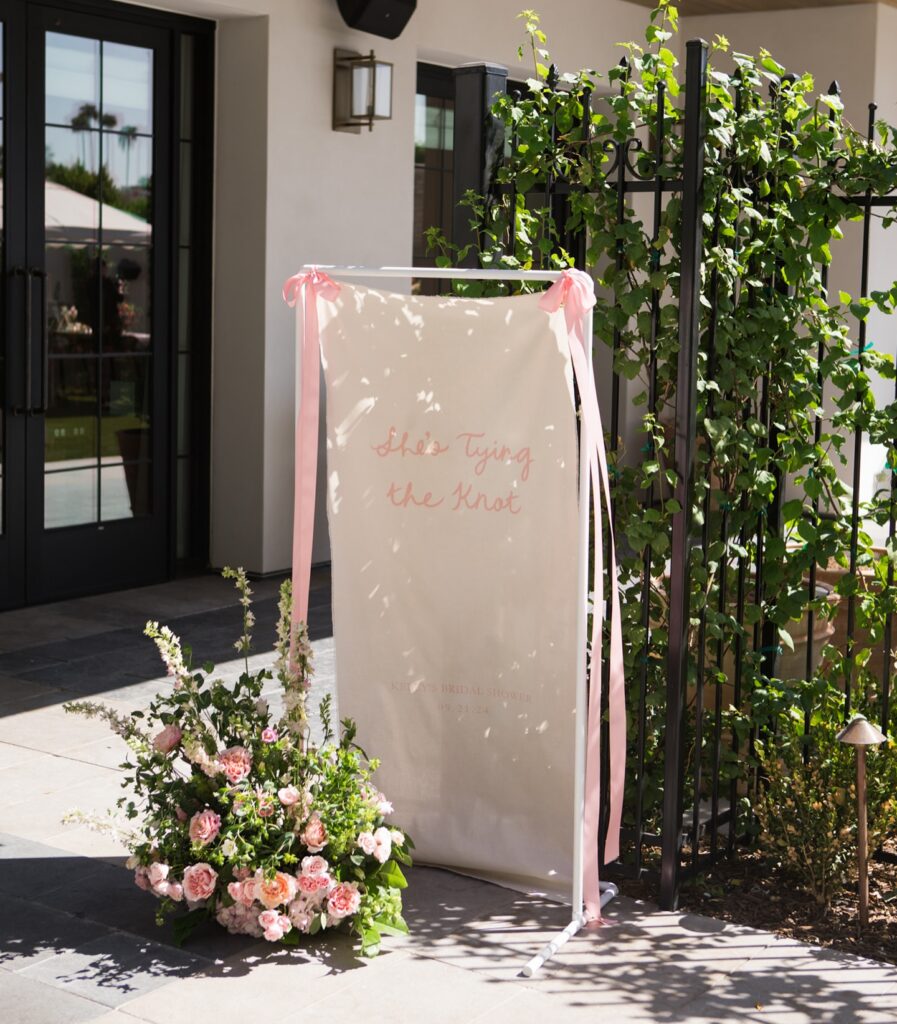
Hang a printed canvas banner from a white pipe stand using two long ribbon ties — the ribbons do double duty, holding the sign and trailing down to the ground, which fills the vertical space without needing anything else. The flower cluster sitting at the base here is mostly garden roses and loose greenery, nothing too structured, and it’s placed on one side only rather than split evenly between both legs. Asymmetrical looks better in person than it sounds on paper.
If the shower is outdoors, weigh the stand with a sandbag inside the base or the whole thing tips in any breeze. For an indoor venue, skip the floor arrangement and just let the ribbons hang — the sign reads fine on its own.
Entrance Welcome Sign
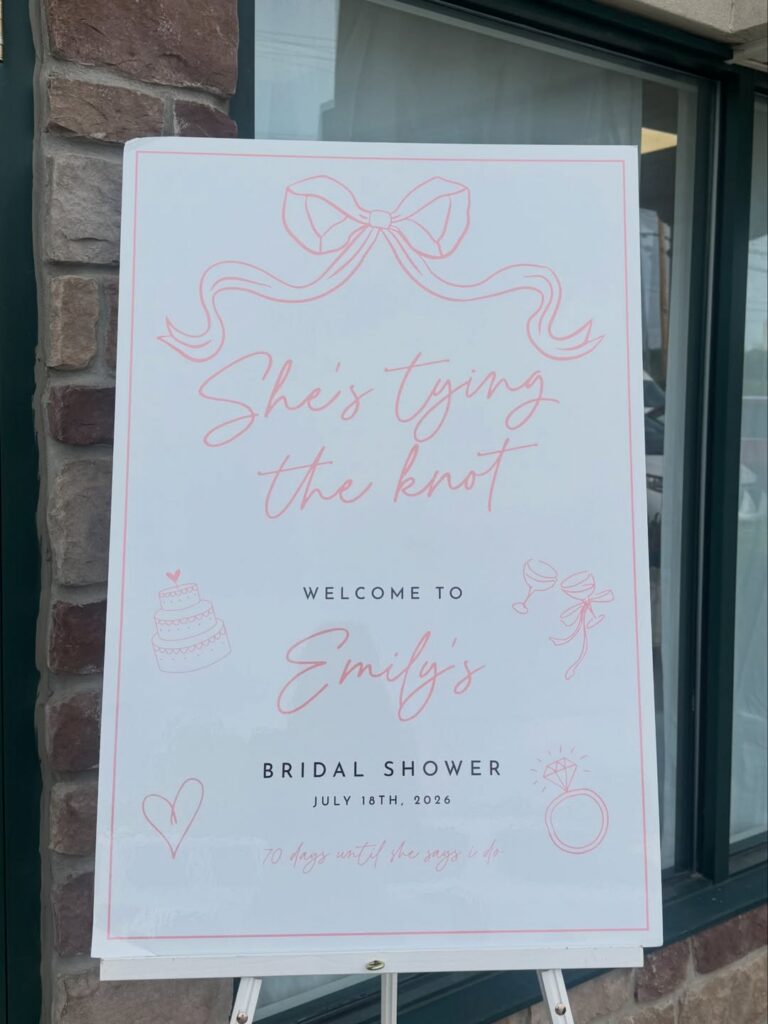
Right at the entrance, let the sign do the explaining before anyone asks where to go. Keep it pale. The pink line-art bow, the small cake, glasses, heart, and ring all work because they repeat the bridal theme without turning the board into a poster full of clipart.
Leave breathing room. Use the bride’s name in a larger script, then put the shower date and wedding countdown in small letters near the bottom. I’d skip the extra icons if your venue already has a lot going on; one bow at the top is enough.
A Recipe Card Station
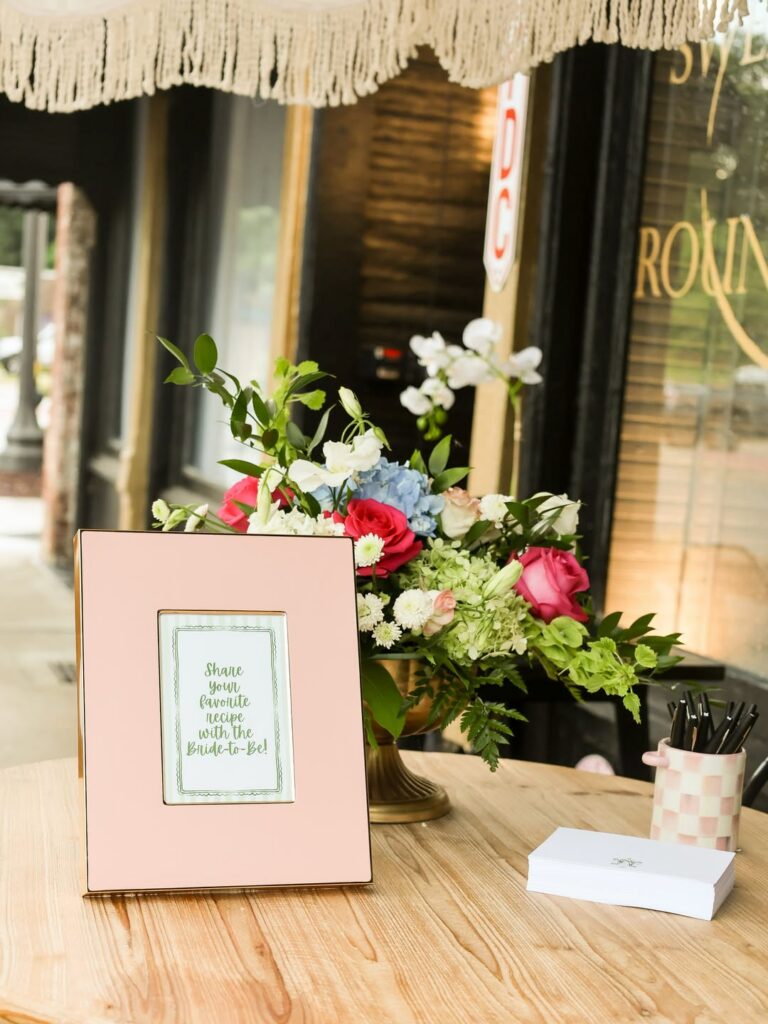
Set out a framed prompt like the one here — “Share your favorite recipe with the Bride-to-Be!” — with blank cards and a cup of pens nearby. Guests fill one out during the shower. She goes home with a stack of real recipes from the people who actually cook for her.
The pink frame and florals here match a girly shower, but the setup works with any palette. Swap in kraft cards for a garden theme, or gold-edged ones for something dressier.
One thing I’d change. Use cards that all match in size, because if you leave it open-ended, you’ll get everything from index cards to torn notebook paper, and the box she stores them in won’t close properly. Ask me how I know.